.svg)
.jpeg)
If you've been active on Facebook lately, you've probably noticed that Facebook Video Ads and video posts can be seen almost everywhere on their platform.
Videos have completely dethroned images in the marketing world 👑. Facebook has also embraced a video-first strategy, so much so that one of their execs even predicted they could be a video-only platform by 2021 🔮.
Creating videos for Facebook Ads can seem like a daunting and potentially large investment if you're new to videos and don't have any previous video production experience.
But it doesn’t have to be - especially with Facebook's Video Creation Kit which is completely free and easy to use 🙌.
Below we'll show you how to create a video ad using free templates from Facebook's Video Creation Kit that save you time and money, and provide some targeting & measurement tips along the way.
So let's get started!
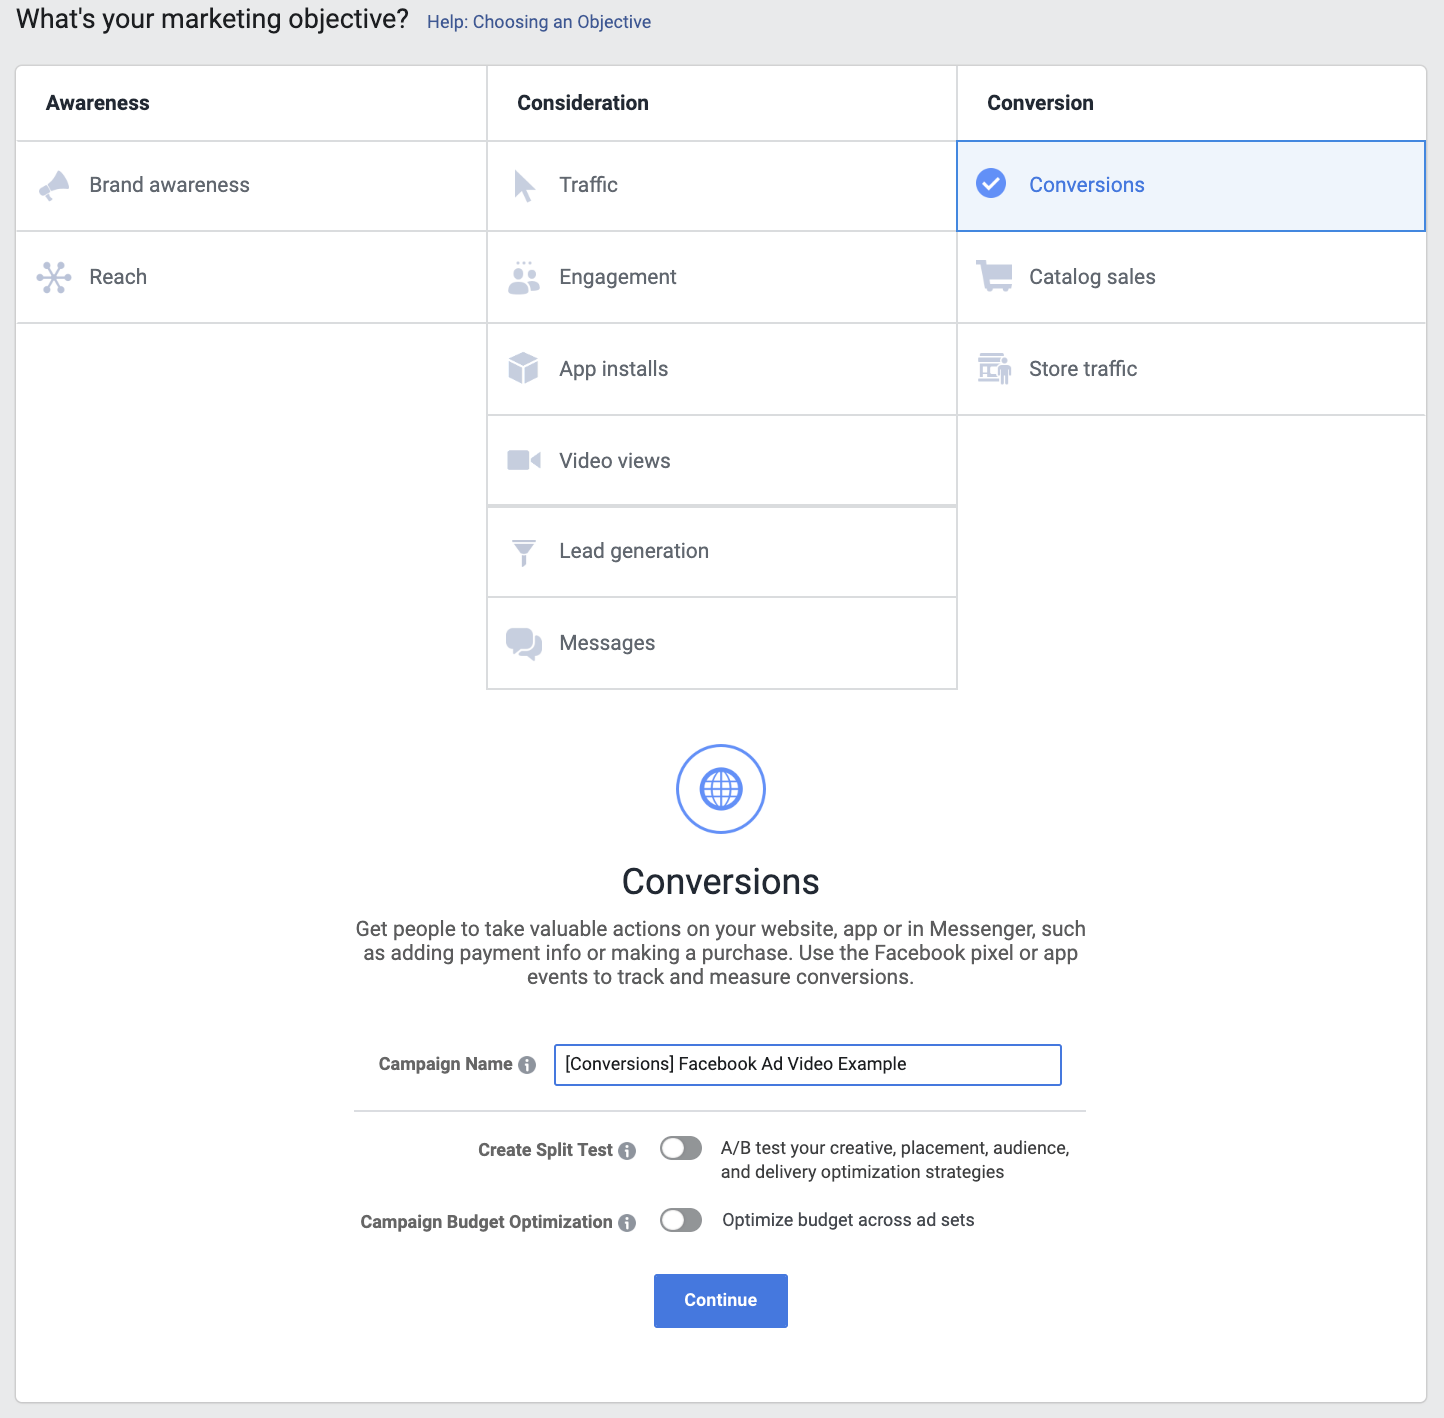
Step 1: Visit Facebook Ads Manager & Select a Campaign Objective
- Visit the Ads Manager creation flow here.
- Select your Campaign Objective based on what you'd like people to do when they see your ad.
- We'll select the Conversions objective for this example, since getting conversions on our site is our main objective.
- Then, give your Campaign a name.
Step 2: Setup your Ad Set
- Give your Ad Set a name.
- If you've selected Conversions as your Campaign Objective, select a Conversion event to optimize your ads delivery for (e.g. purchase).
- Determine your Audience (more tips below).
- Select your Placements across Devices (mobile and desktop) and Platforms (Facebook, Instagram, Messenger, and Audience Network).
- Set a Budget & Schedule.
🎯 When selecting your target audience, you have various options:
- 👥 Custom Audiences based on your existing customers.
- 👯♀️ Lookalike Audiences based on people who are similar to your best customers.
- ⛹️♂️ Facebook's Detailed Targeting to include or exclude certain keywords for people's demographics, interests and behaviors.
- 📱 Connections to your Facebook Page, app, or event.
With Custom Audiences, we typically retarget people who've clicked on any links we've shared 🔗 (including 3rd party articles!) as a way to re-engage people who've shown interest in our content.

💪 Pro tips:
- Use Audience Builder to automatically create retargeting audiences from anyone clicking on your links.
- Learn how to retarget people who click on any of your links (e.g. Medium articles, PR news, YouTube videos) with our Facebook Ads link retargeting guide.
- When selecting Placements, it's a good idea to setup separate ads for each platform (e.g. Facebook and Instagram) to better optimize your creative and messaging.
Step 3: Setup your Video Ad
This is where you'll setup all your Video Ad details 🎉
- Add an ad name.
- Choose which sources you want to represent your ad. For example, we always connect our ads to both our Facebook Page "PixelMe" and Instagram account "pixelmeinc".

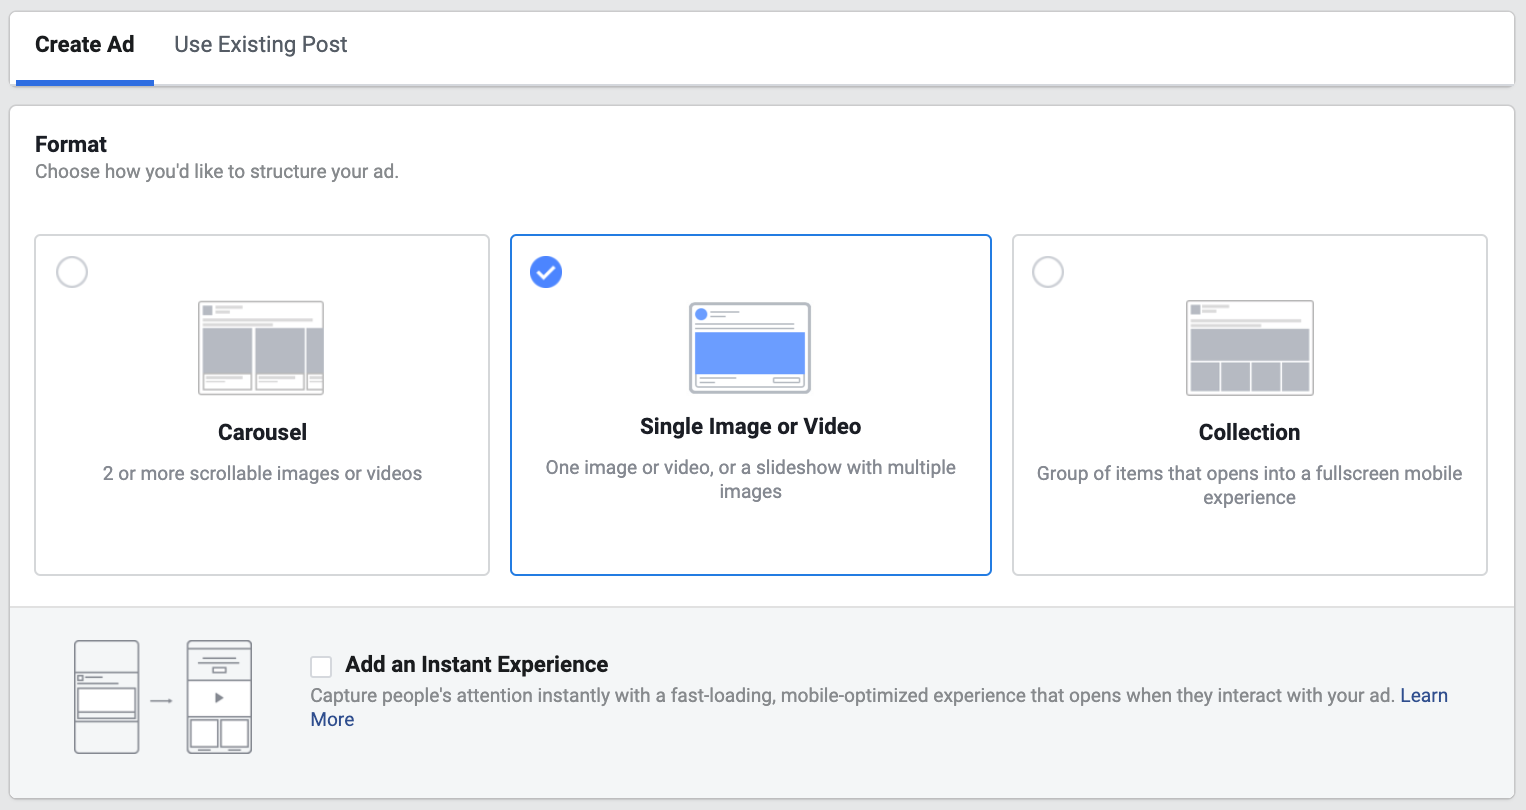
Step 4: Select "Single Image or Video" as your ad format
Under Format, select the second option for "Single Image or Video".
Step 5: Choose from a Video Template
This is where you'll finally be able to create a video ad using any of Facebook's free video templates.
Under "Media" > select "Create Media" > choose "Use Video Template".

Then, select any of their available templates - either Square or Vertical templates.
- 📜 Square is recommended for ads in Facebook News Feed & Instagram News Feed. They support a 1:1 aspect ratio.
- 📕 Vertical is recommended for ads in Facebook Stories & Instagram Stories. They support a 9:16 aspect ratio.
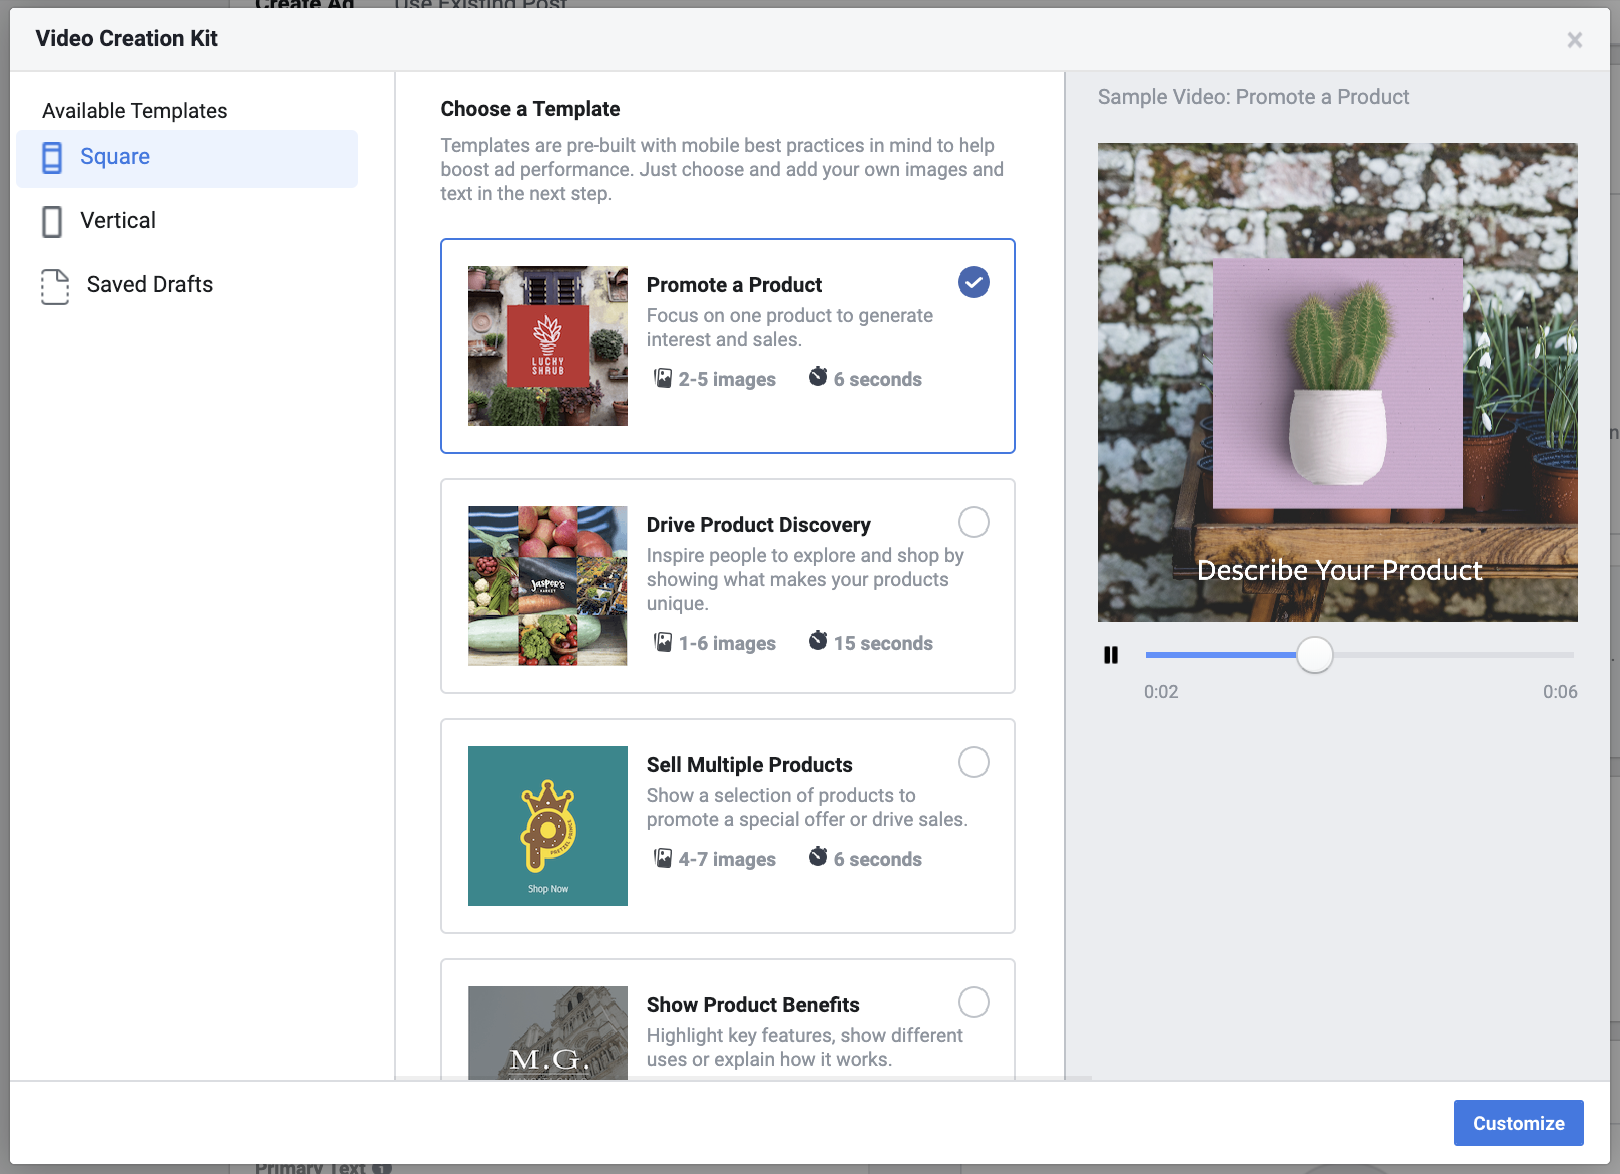
You can choose from the following 13 free video templates below.
Note: Each of them have a different look and feel to the overall design, image treatments, text overlays, and logo placements.
- 📊 Promote a Product (2-5 images; 6 seconds): promote a key product with different messaging overlays, and end with a CTA.
- 🎢 Drive Product Discovery (1-6 images; 15 seconds): tell a story about your products with multiple image grids and message overlays.
- 🔢 Sell Multiple Products (4-7 images; 6 seconds): highlight multiple products at once.
- ✅ Showcase Product Benefits (5-10 images; 15 seconds): showcase a product with multiple images rotating in the background.
- ⏹ Showcase a Square Image (1-2 images; 6 seconds): promote a key product with a simple animation that overlays your logo, headline, and CTA.
- ▭ Showcase a Horizontal Image (1-2 images; 6 seconds): promote a key product in horizontal format, with a simple animation that overlays your logo, headline, and CTA.
- 🔦 Spotlight an Image (1-4 images; 6 seconds): promote a key product image, then overlay it with a message, and end with your logo.
- 🎉 Feature an Image (1-4 images; 10 seconds): show an image with your logo thumbnail, then an animated headline, and end with your logo.
- 💥 Highlight an Image (1-4 images; 6 seconds): show an image with a zoom-in and text overlay.
- 📕 Display a Product (1-3 images; 6 seconds): showcase a product with a promotional message.
- ▭ Present a Horizontal Image 1-2 images; 6 seconds): show an image with a CTA overlay, and include your logo at the end.
- 🏢 Feature Your Brand 1-2 images; 6 seconds): showcase your brand, logo, and a message.
- 🖼 Frame an Image (1-3 images; 6 seconds): show an image with 2 text overlays, and include your logo at the end.
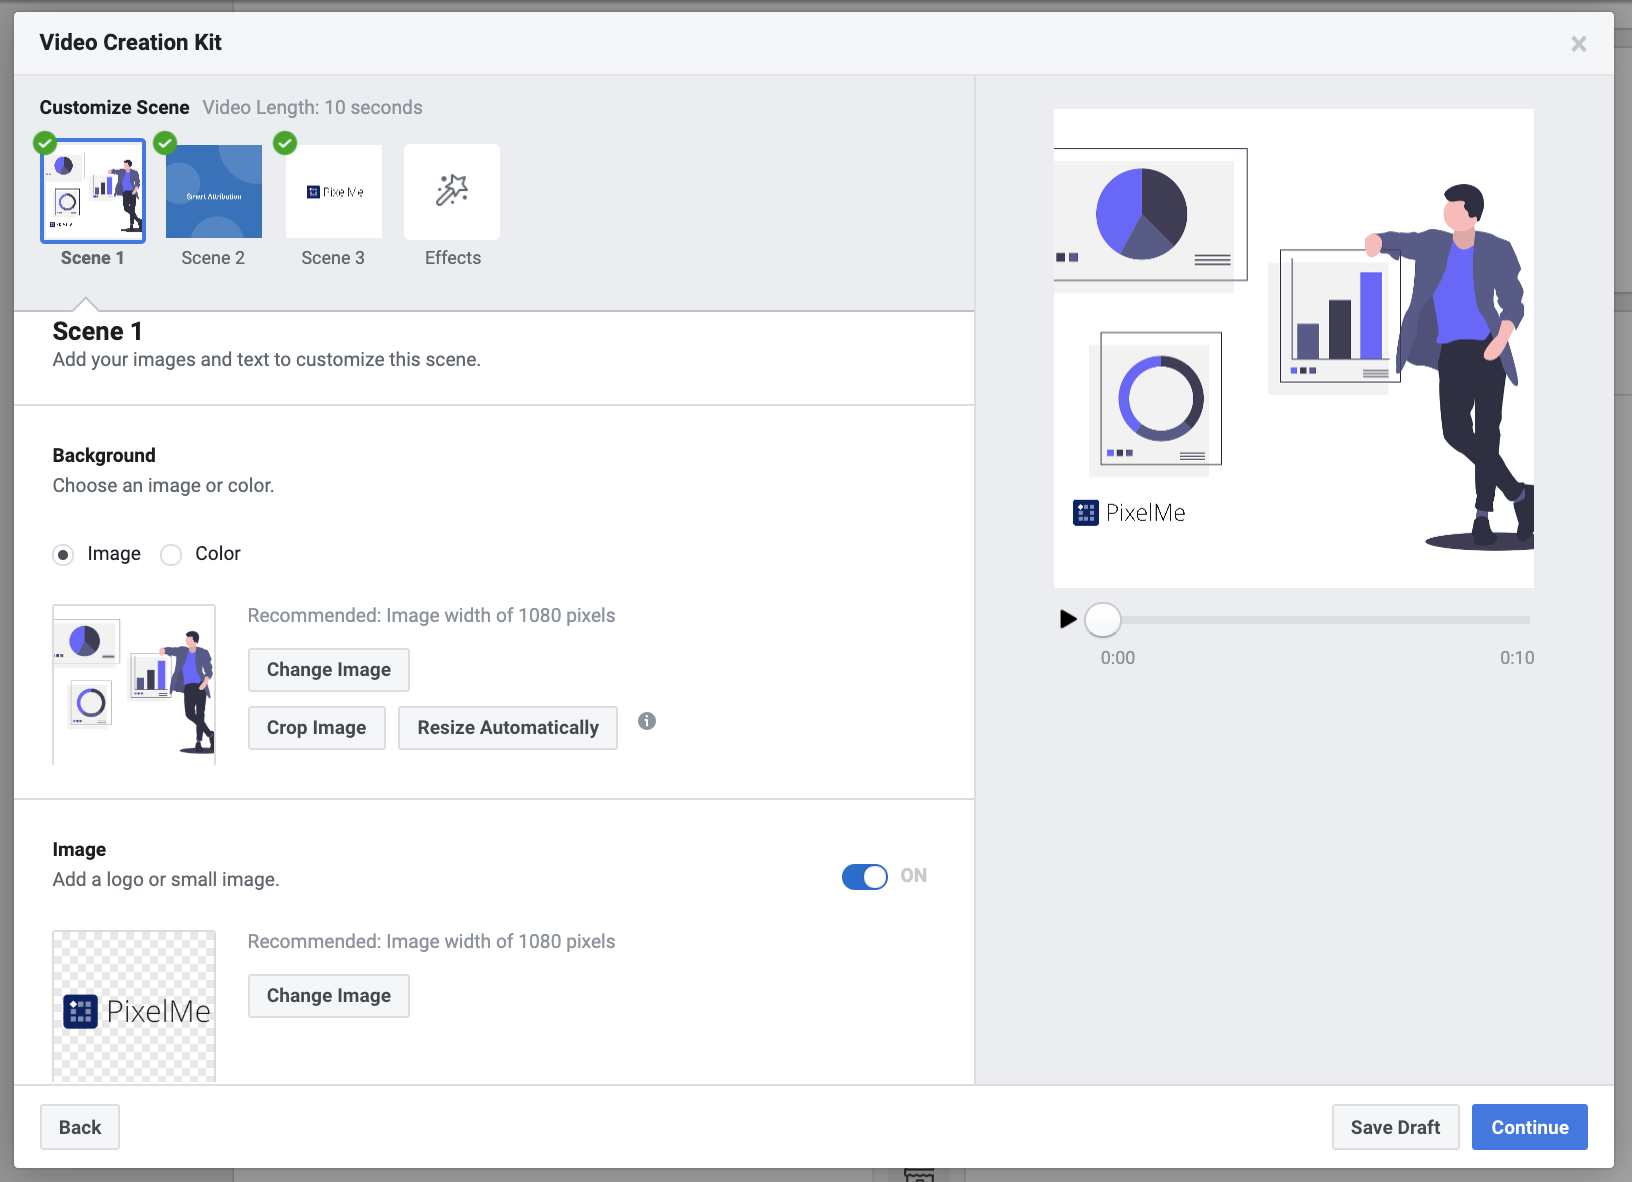
Step 6: Customize the Video Template
Once you've selected a template, you can customize it with different images, text overlays, messaging, effects (stickers, frames, and colors), and your logo.
For example, we've selected the "Feature an Image" Square template which features 3 customizable scenes along with effects you can add.

For Scene 1, you can add a background image and customize the background color.
You can also add a logo and choose how large you'd like it to show in the image.
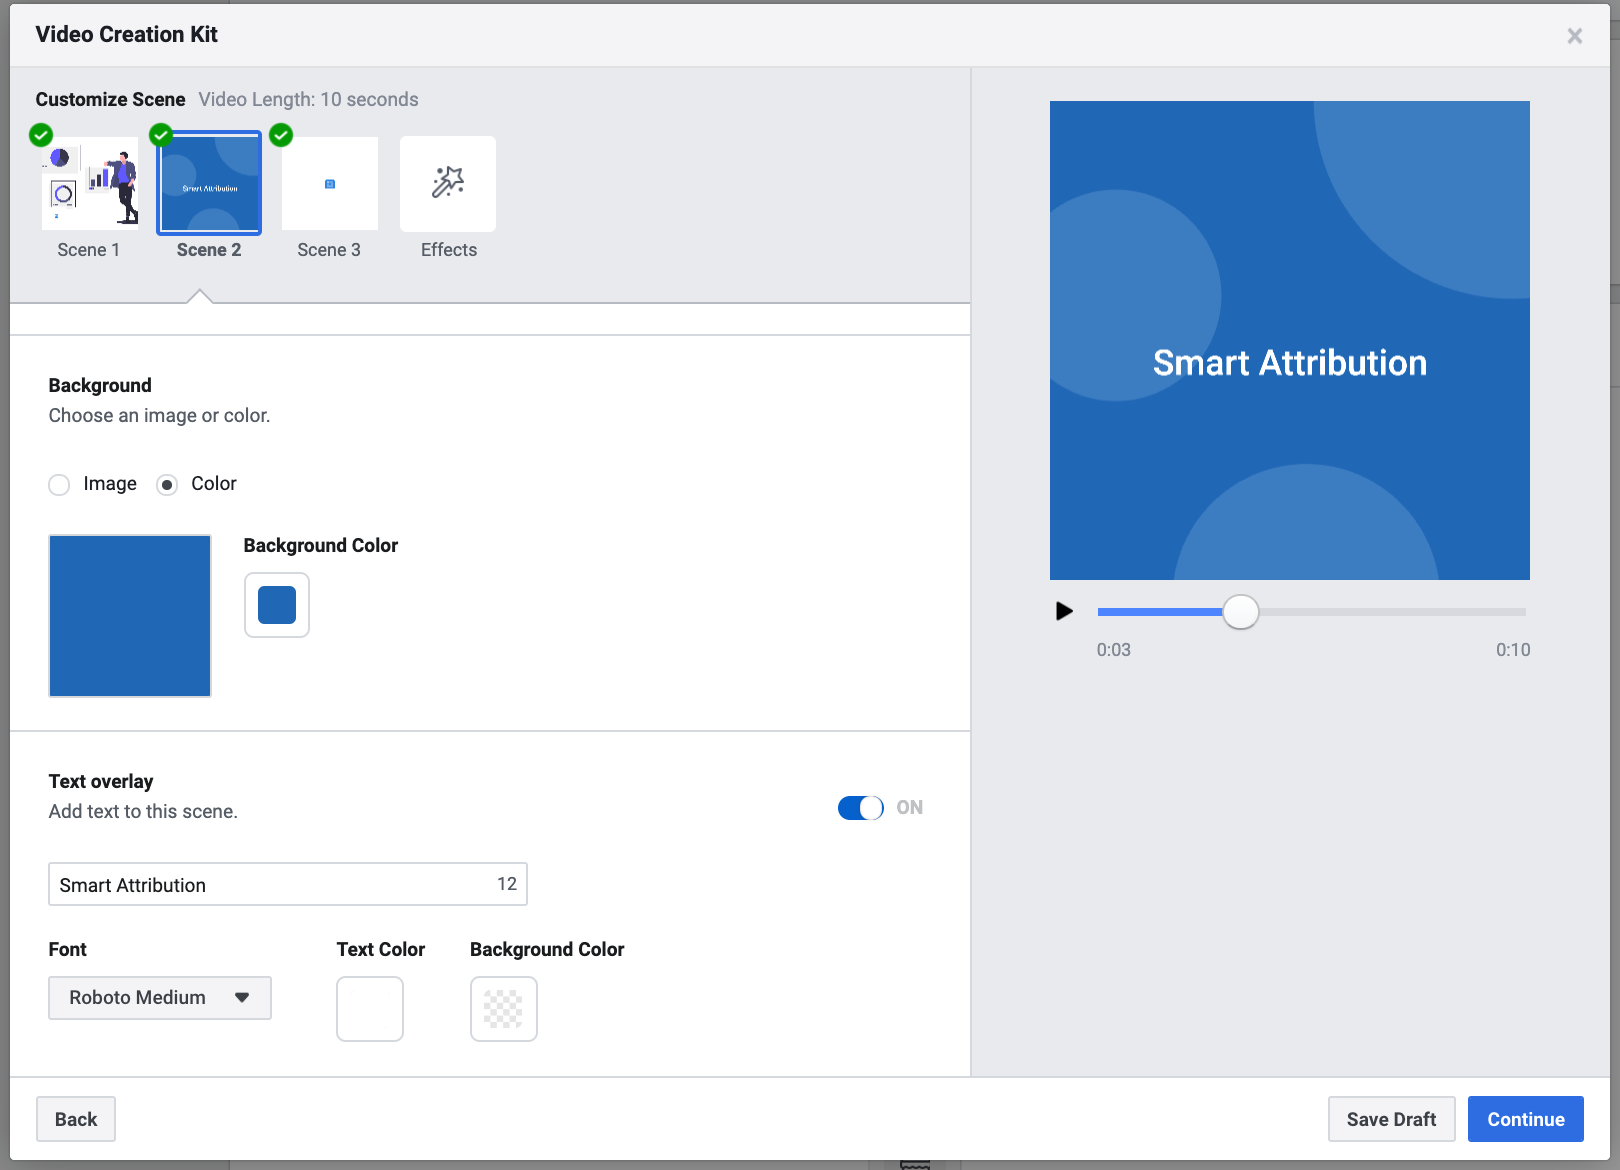
For Scene 2, you can select another image or simply put a background color.
Then, add a text overlay (optional; maximum 30 characters) to describe your product image. We used our product name "Smart Attribution" since we're featuring our customer attribution tool.
You can also customize the font, text color, and background color.
🎨 Pro tip: you can add the hex code for any background colors to match your brand color schemes.
For Scene 3, you can select another image or background color again.
We just left it simple with no background color, since the template automatically overlays the company logo you uploaded from Scene 1.

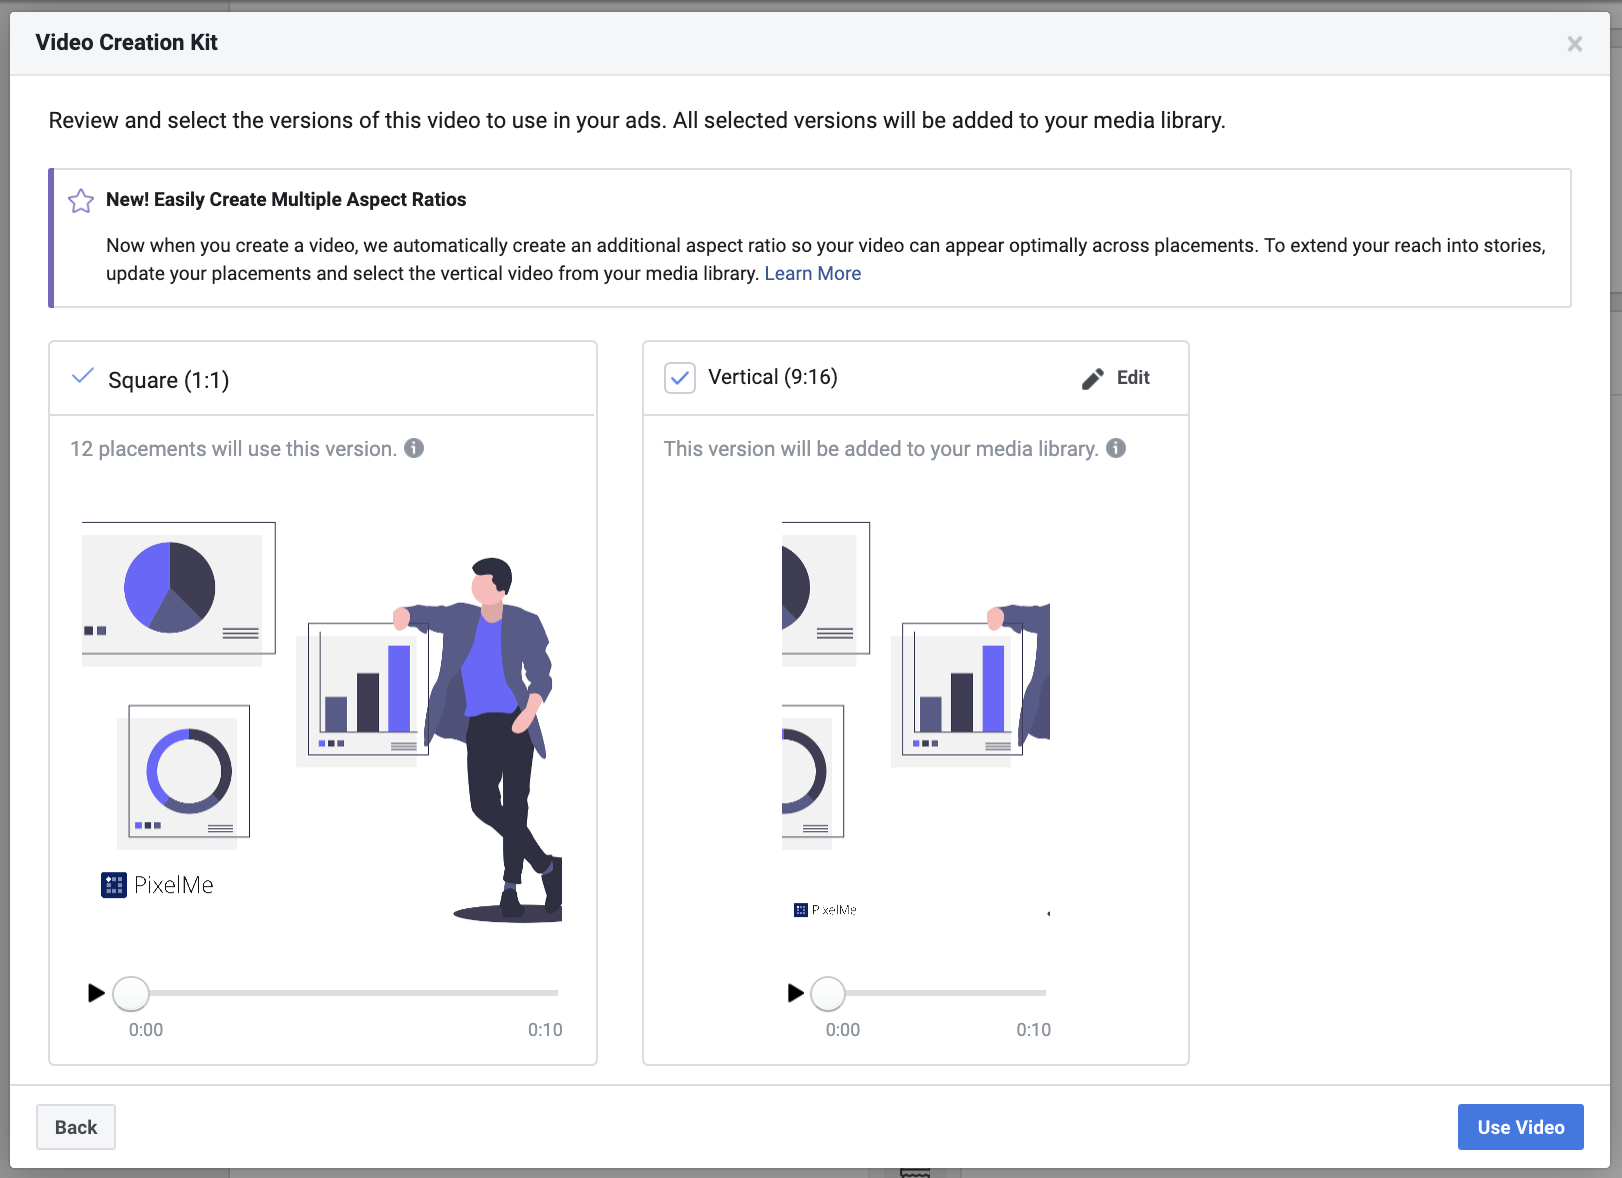
Finally, you can preview the video ad in both Square and Horizontal format, and press Back to make any changes.
Select "Use Video" if you're satisfied and ready to finalize your new video ad 💪. All videos you create will automatically be added to your own ad library, so you can use it again anytime 🙌.
Step 7: Include Ad Text
You're almost there! Now you'll need to add some ad text to describe the benefits of the product you're promoting (it's recommended to have 125 characters or less).
You can also include an optional Headline and Description for your video ad.

Step 8: Add a Tracking URL & Launch Your Ad
Finally, include your website URL where you'd like to send people who click on the ad, as well as a CTA button.
We always add UTM tags to our ad URLs, so we can track our website traffic sources and see which campaigns and channels are performing best.

You'll also be able to preview your video on the right before launching it:

💪 Pro tips:
- Use our Smart Attribution tool to automatically track your Facebook Ads ROI across campaigns, and see how they compare with other channels 🔥.
- You can preview your video ad again across different platforms and placements, by pressing the play button ▶️ in the preview.
And you're all set! 🎉
As you can see, it's super easy to use Facebook's Video Creation Kit templates. It only takes a few minutes to make your own customizable video ads that can drive higher engagement and conversions.
To see how well your new video ads convert compared to other campaigns & channels, and where Facebook Ads fit into your customer journeys (e.g. first touch, second touch, last touch), it's always good idea to use marketing attribution.
Want to track your Facebook Ads ROI? Sign up for a free 7-day PixelMe trial 🎉. Or send us a message from the chat icon in the bottom right-hand corner! 💬
To get more exclusive marketing tips, subscribe to our PixelMe newsletter 🥳
%20(1).webp)